- Published on
How to Send Emails with AWS SES SDK in NextJS 2025
- Authors

- Name
- QuizCld
In the previous blog, we already know about what Amazon SES is and how it works. In this blog, we will start with real-life use cases when integrating Amazon SES with a react framework NextJs to sending email at scale.
Overview
This part is the beginning step toward building your own mail server. Instead of manually sending emails (as we did in Part 1), we’ll now use AWS SDK with NextJS to automate the process.
We’ll also introduce React Email, a library to design simple but beautiful email templates before sending them.
Keep in mind: this is still sandbox mode in AWS SES. That means you can only send emails to addresses that are verified first. Next part, we will deploy it as a SAAS application that you can make money from it.
AWS SDK for JavaScript (v3) provides a collection of modular packages that allow developers to interact with AWS services directly from their applications. For SES (Simple Email Service), the SDK gives us APIs to:
- Verify email identities and domains.
- Send and receive transactional or bulk emails.
- Manage configurations and monitor delivery status.
It’s lightweight, flexible, and integrates smoothly into modern frameworks like NextJS.
NextJS is a full-stack React framework. In this setup, we’ll use it not only for the frontend UI but also for server-side logic via API routes. That allows us to securely handle AWS credentials and email-sending logic on the backend side of the app
React-email is a collection of high-quality, unstyled components for creating beautiful emails using React and TypeScript.
Source code: How to Send Emails with AWS SES SDK in NextJS 2025
Sending a Test Email in Sandbox Mode with AWS SDK in NextJS
Assume that, we own 1 domain and have enough necessary records in AWS Route53 (part 1).
Step 1: Verify the Domain in SES
This step is authentication must to have, allow SES send mails for your domain safely.
We need packages, from your terminal run the following command to install the SDK:
bun i @aws-sdk/client-route-53 @aws-sdk/client-sesv2
Using SESv2Client and Route53Client
const ses = new SESv2Client({
 region: process.env.AWS_SES_REGION!,
 credentials: {
   accessKeyId: process.env.AWS_ACCESS_KEY!,
   secretAccessKey: process.env.AWS_SECRET_KEY!,
   sessionToken: process.env.AWS_SECRET_TOKEN!,
 },
})


const route53 = new Route53Client({
 region: process.env.AWS_SES_REGION!,
 credentials: {
   accessKeyId: process.env.AWS_ACCESS_KEY!,
   secretAccessKey: process.env.AWS_SECRET_KEY!,
   sessionToken: process.env.AWS_SECRET_TOKEN!,
 },
})
- Identity domain and copy generated records (DKIM) , paste to Route 53
async function setupSesIdentity() {
 const createResp = await ses.send(
   new CreateEmailIdentityCommand({
     EmailIdentity: domain,
     DkimSigningAttributes: { NextSigningKeyLength: 'RSA_2048_BIT' },
   })
 )
 console.log('✅ SES Identity created:', createResp)
 const dkimTokens = createResp.DkimAttributes?.Tokens ?? []
 const changes: any[] = []
 dkimTokens.forEach((token: string) => {
   changes.push({
     Action: 'UPSERT',
     ResourceRecordSet: {
       Name: `${token}._domainkey.${domain}.`,
       Type: 'CNAME',
       TTL: 1800,
       ResourceRecords: [{ Value: `${token}.dkim.amazonses.com` }],
     },
   })
 })
 const route53Resp = await route53.send(
   new ChangeResourceRecordSetsCommand({
     HostedZoneId: hostedZoneId,
     ChangeBatch: { Changes: changes },
   })
 )
 console.log('✅ Route 53 records created:', route53Resp)
}
Of course, you need to wait AWS verify about some minutes. Check in console if success or use GetEmailIdentityCommand of @aws-sdk/client-sesv2 to check status (see more in source code).
Once you ran the code, wait for a minutes, the domain will be verified from Amazon SES, the below screenshot is an example:

Additionally, AWS Route53 also automatically adding four CNAME records which for DKIM validation.

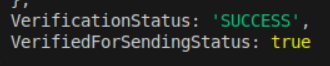
From terminal, you will be noticed the success status:
Function setupSesIdentity() only run once to verify domain. If verify successfully, it's unnecessary to run multiple time.
Step 2: Verify Email Addresses
The following steps are required for a sandbox environment. Once testing is completed, we dont need this step in production environment. Like the previous step, we only need to run the code once:
async function createEmailIdentity(email: string) {
 const cmd = new CreateEmailIdentityCommand({
   EmailIdentity: email, // e.g. admin@haxuan.link
 })
 const resp = await ses.send(cmd)
 console.log('✅ Email identity created:', resp)}
Verify in gmail, then check in console or use GetEmailIdentityCommand of @aws-sdk/client-sesv2 to verify the gmail.
Step 3: Send a Test Email
There are multiple ways to send an email via Amazon SES, in this blog, we will use SendEmailCommand to @aws-sdk/client-sesv2.
Firstly, install react-package by running the following command:
npm install @react-email/components
The folowing code blog is a function email template which will return a template email with some custom arguments
import * as React from 'react';
import { Html } from '@react-email/html';
import { Text } from '@react-email/text';
import { Heading } from '@react-email/heading';
export default function WelcomeEmail({ name }: { name: string }) {
 return (
   <Html>
     <Heading>Hello, {name} 👋</Heading>
     <Text>Welcome to our platform. Glad to have you!</Text>
   </Html>
 );
}
To send the email, using the following code
export async function sendWelcomeEmail(toEmail: string, name: string) {
 const emailHtml = await render(WelcomeEmail({ name }))


 const params = {
   FromEmailAddress: `${process.env.SENDER_EMAIL}`, // Must be verified in SES
   Content: {
     Simple: {
       Subject: { Data: 'Welcome to Our Platform' },
       Body: {
         Html: { Data: emailHtml },
       },
     },
   },
   Destination: {
     ToAddresses: [toEmail],
   },
 }
 const command = new SendEmailCommand(params)
 const response = await ses.send(command)
 return response
}
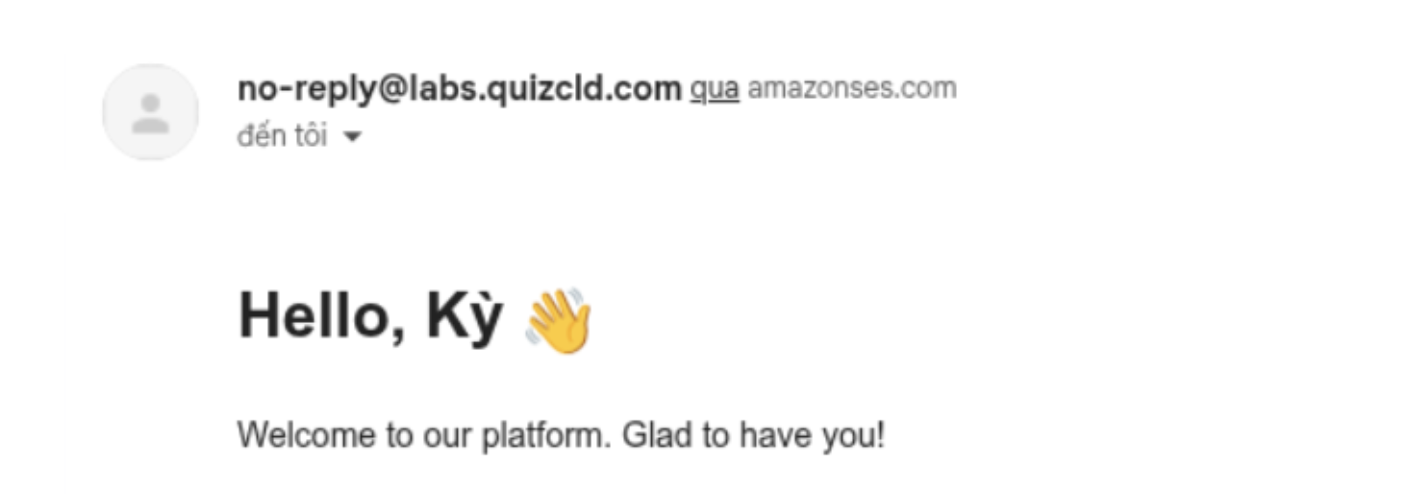
To verify the email sent success or not, go to the mail box and look for the following example
Conclusion
In this part, we used AWS SDK, NextJS, and React Email to send a test email from our domain to a verified user through Amazon SES. We also configured DKIM with Route53 to make sure the domain is authenticated and trusted. This is the first step toward building a mail server for your domain. Right now, we’re still working in sandbox mode, which means every recipient must be verified before receiving emails.
In the next blogs, we’ll continue to expand this setup — moving out of sandbox mode, handling bulk emails, tracking delivery, and eventually developing it into a fully functional mail server for your application.